Skill 1.2: Plan and implement Windows 10 by using Windows Autopilot
Within a domain-based environment, deploying new devices to users has become increasingly complex. There are many “moving” parts and components, and each one needs to work precisely to ensure devices are compliant, secure, and usable. This is partly due to the granular nature of the tooling used to ensure that devices comply with strict organizational security requirements. Windows Autopilot is a solution that radically changes this approach while allowing IT administrators to deploy secure and compliant devices.
You must understand how to plan and implement Windows 10 within an organization using Windows Autopilot. This skill explores the planning, example scenarios, and installation requirements for the application of Windows Autopilot.
This skill covers how to:
- Choose method based on requirements
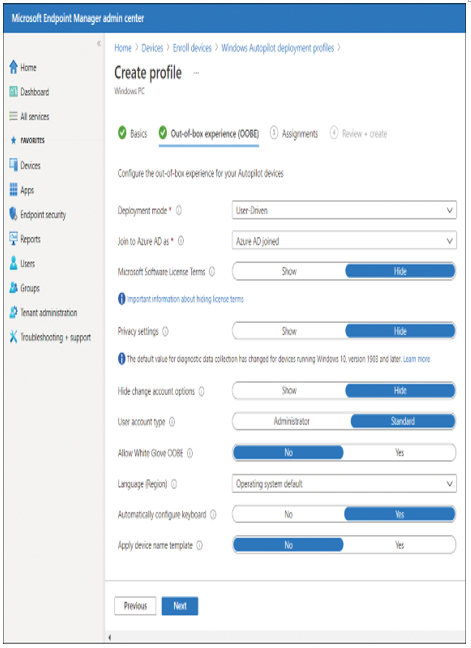
- Create, validate, and assign deployment profiles
- Extract device hardware information
- Import device hardware information to a cloud service
- Deploy Windows 10
- Troubleshoot deployment
Choose method based on requirements
Windows Autopilot offers a new method of provisioning Windows 10 within an enterprise. Of course, it is not the only deployment choice, and indeed, there will be scenarios in which using Autopilot would be folly.
You must explore each of the available deployment options. These options include technology such as MDT or Configuration Manager that may be currently used within your organization. Other methods, such as using Windows Autopilot or Microsoft Intune, may be worth employing to achieve your Windows 10 deployment goals.
Listed in Table 1-9 are many different methods that you can use to deploy and configure Windows 10. You need to understand when to use each deployment method.
TABLE 1-9 Methods for deploying and configuring Windows 10
| Method | Description |
| Windows Autopilot | Transform an existing Windows 10 installation, join the device to Azure AD, and enroll it into a Mobile Device Management solution to complete configuration. Deploy Windows 10 on an existing Windows 7 or 8.1 device. |
| Windows 10 Subscription Activation | Upgrade the Windows edition seamlessly without requiring intervention or rebooting of the device. |
| Azure AD / MDM | Cloud-based identity and management solution offering device, app, and security configuration. |
| Provisioning Packages | Small distributable .appx files that securely transform devices to meet organizational requirements. |
| In-place Upgrade | Upgrade an earlier version of Windows to Windows 10 while retaining all apps, user data, and settings. |
| Bare-metal | Deploy Windows 10 to newly built devices or wipe existing devices and deploy fresh Windows 10 images to them. |
| Refresh (wipe and load) | Re-use existing devices. Retain user state (user data, Windows, and app settings). Wipe devices, deploy Windows 10 images to them, and finally, restore the user state. |
| Replace | Purchase new devices. Back up the user state from the current device. Transform or wipe a pre-installed Windows 10 installation and restore the user state. |