Category Archive : Authentication methods

Manage Windows Hello for Business with Intune – Deploy and upgrade operating systems

Manage Windows Hello for Business with Intune

Windows Hello for Business can be deployed using a device configuration profile, which allows you to configure various settings on Windows 10.

With Intune device configuration profiles, you can permit or block the use of Windows Hello for Business, and you can configure the following settings:

  • Minimum PIN Length
  • Maximum PIN Length
  • Lowercase Letters In PIN
  • Uppercase Letters In PIN
  • Special Characters In PIN
  • PIN Expiration (Days)
  • Remember PIN History
  • Enable PIN Recovery
  • Use A Trusted Platform Module
  • Allow Biometric Authentication
  • Use Enhanced Anti-Spoofing When Available
  • Certificate For On-Premises Resources

You can also use Intune device enrollment policies to configure Windows Hello for Business settings during the initial device enrollment into management.

Configure PIN

To avoid sign in using passwords, Microsoft provides an authentication method that uses a PIN in association with Windows Hello. When you initially set up Windows Hello, you’re first asked to create a PIN. This PIN enables you to sign in using the PIN as an alternative—such as when you can’t use your preferred existing biometric method because of an injury, because the sensor is unavailable, or because the sensor is not working properly. The PIN provides the same level of protection as Windows Hello.

Windows Hello PIN provides secure authentication without sending a password to an authenticating authority, such as Azure AD or an AD DS domain controller. Windows Hello for Business provides enterprises compliance with the latest FIDO 2.0 (Fast Identity Online) framework for end-to-end multifactor authentication.

If the user does not use Windows Hello for Business, then the user cannot use an associated PIN. Within a domain environment, a user cannot use a PIN on its own. (This method of sign-in is known as a Convenience PIN.) You will see from the user interface displayed in Figure 1-20 that the PIN settings are within the Windows Hello section of the Sign-In Options. A user must first configure Windows Hello and be already signed in using a local account, a domain account, a Microsoft account, or an Azure AD account. The user is then able to set up PIN authentication, which is associated with the credential for the account.

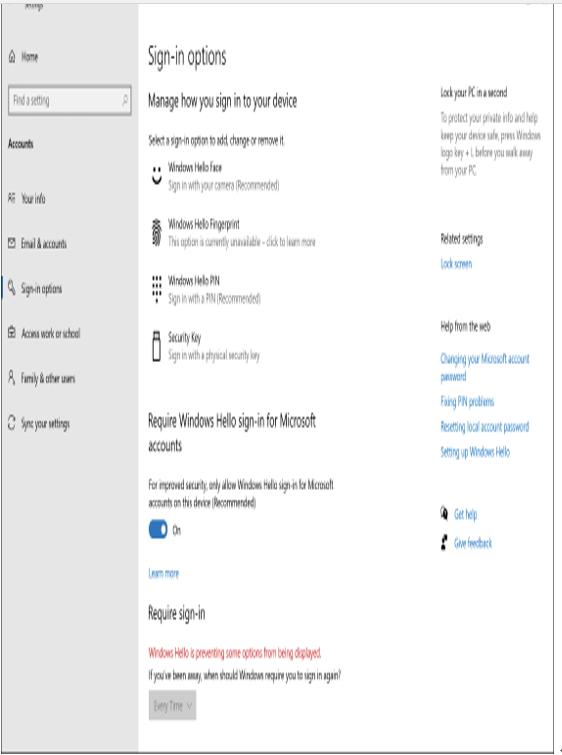
Figure 1-20 Configuring Windows sign-in options

After a user has completed the registration process, Windows Hello for Business performs the following operations to secure the credentials:

  1. Generates a new public-private key pair on the device known as a protector key.
  2. If installed in the device, the TPM is used to generate and store this protector key.
  3. If the device does not have a TPM, the Windows 10 operating system encrypts the protector key and stores it within the file system.
  4. Windows Hello for Business also generates an administrative key that is used to reset credentials if necessary.

Note Pairing of Credentials and Devices

Windows Hello for Business pairs a specific device and a user credential. Consequently, the PIN the user chooses is associated only with the signed-in account and that specific device. A user is unable to sign in on another device unless he or she initiates the Windows Hello setup on the device.

The user now has a PIN gesture defined on the device and an associated protector key for that PIN gesture. The user can now securely sign in to their device using the PIN; also, the user can add support for a biometric gesture as an alternative for the PIN. The gesture can be facial recognition, iris scanning, or fingerprint recognition, depending on available hardware in the device. When a user adds a biometric gesture, it follows the same basic sequence as mentioned earlier. The user authenticates to the system by using the PIN and then registers the new biometric. Windows generates a unique key pair and only stores this on the device. There is no Windows Hello biometric data stored in the Microsoft Cloud.

You can create and implement policies for using Windows Hello for Business in your organization. For example, you can configure a policy that enables or disables the use of biometrics on devices affected by the policy. If allowed to use Windows Hello for Business, a user can then sign in using the PIN or a biometric gesture.

Need More Review? Windows Hello for Business

To review further details about Windows Hello for Business, refer to the Microsoft website at https://docs.microsoft.com/windows/security/identity-protection/hello-for-business/hello-identity-verification.

You can use MDM policies or GPOs to configure settings for Windows Hello for Business.

Note Enhancing the Security of a Pin

When we think of a PIN, we generally think of ATM cash machines and four-digit PINs. When securing Windows 10 with Windows Hello for Business, you can significantly increase the level of security by imposing rules on PINs. For example, a PIN can require or block special characters, uppercase characters, lowercase characters, and digits. A PIN such as t496A? could be a complex Windows Hello PIN. The maximum length that can be set is 127 characters.

To configure PIN complexity with Windows 10 (with and without Windows Hello for Business), you can use the eight PIN Complexity Group Policy settings that allow you to control PIN creation and management.

These policy settings can be deployed to computers or to users. If you deploy Group Policy settings to both, then the user policy settings have precedence over computer policy settings, and GPO conflict resolution is based on the last applied policy. The policy settings included are as follows:

  • Require Digits
  • Require Lowercase Letters
  • Maximum PIN Length
  • Minimum PIN Length
  • Expiration
  • History
  • Require Special Characters
  • Require Uppercase Letters

In Windows 10, the PIN complexity Group Policy settings are located at Administrative Templates > System > PIN Complexity, under both the Computer and User Configuration nodes.

Configure Dynamic Lock – Deploy and upgrade operating systems

Configure Dynamic Lock

Users with smartphones can take advantage of a feature introduced with the Creators Update for Windows 10 Version 1703, which allows users to automatically lock their devices whenever they’re not using them. (At the time of this writing, iPhone devices do not support this feature.)

This feature relies on a Bluetooth link between your PC and paired smartphone.

To configure Windows 10 Dynamic Lock, use the following steps:

  1. Open the Settings app and select Accounts.
  2. Select Sign-in options and scroll to Dynamic lock.
  3. Select the Allow Windows to lock your device automatically when you’re away check box.
  4. Select the Bluetooth & other devices link.
  5. Add your smartphone using Bluetooth and pair it.
  6. Return to the Dynamic lock page, and you should see your connected phone.
  7. Your device will be automatically locked whenever Windows detects that your connected smartphone has moved away from your desk for 30 seconds.

You can configure Dynamic Lock functionality for your devices using the Configure Dynamic Lock Factors GPO setting. You can locate the policy setting at Computer Configuration > Administrative Templates > Windows Components > Windows Hello for Business.

Configure VPN client

In Windows 10, you can create a VPN that enables data to be transferred through a virtual private network using a secured connection (known as a tunnel) over a public network, like the internet, as displayed in Figure 1-21.

Figure 1-21 Using a VPN to connect locations securely over the internet

VPN protocols

Windows 10 supports four commonly used VPN protocols. Each protocol offers different characteristics:

  • Point-to-Point Tunneling Protocol (PPTP) The oldest and what is considered one of the least secure of all supported VPN protocols. However, it can be used successfully in low-security scenarios because it is very easy to set up and still offers more protection than using PPP over the internet. PPTP creates the tunnel and then can use several authentication methods, including the Microsoft Challenge Handshake Authentication Protocol versions 1 and 2 (MS-CHAP v1 and MS-CHAP v2), Extensible Authentication Protocol (EAP), and Protected Extensible Authentication Protocol (PEAP). If EAP is used, certificates can be used with PPTP; otherwise, they are not necessary.
  • Layer 2 Tunneling Protocol (L2TP) This protocol uses the IP security extensions (IPsec) for encryption and encapsulation. L2TP encapsulates the messages with IPsec, and then encrypts the contents using the Data Encryption Standard (DES) or Triple DES (3DES) algorithm. The encryption keys are provided by IPsec using Internet Key Exchange (IKE). L2TP/IPsec can use pre-shared keys or certificates for authentication. Using a pre-shared key is useful during testing and evaluation, but should be replaced with a certificate in a production environment.
  • Secure Socket Tunneling Protocol (SSTP) This protocol encapsulates PPP traffic using the Secure Sockets Layer (SSL) protocol, which is widely supported on the internet and passes through TCP port 443, which is the same as SSL. Using the Extensible Authentication Protocol-Transport Layer Security (EAP-TLS) authentication protocol together with certificates makes SSTP a very versatile and widely used protocol.
  • Internet Key Exchange, Version 2 (IKEv2) IKEv2 is most useful for mobile users and is the default protocol for Windows 10 when trying to connect to remote access servers. This protocol supports IPv6 traffic and the IKEv2 Mobility and Multi-homing (MOBIKE) protocol through the Windows VPN Reconnect feature, which allows automatic reconnection if a VPN connection is lost. Authentication is provided by using EAP, PEAP, EAP-MSCHAPv2, and smart cards. IKEv2 will not support older authentication methods, such as Password Authentication Protocol (PAP) and Challenge Handshake Authentication Protocol (CHAP), which offer low protection.

Creating a VPN connection in Network and Sharing Center – Deploy and upgrade operating systems

Creating a VPN connection in Network and Sharing Center

To create a VPN in Windows 10, from the Network and Sharing Center, under Change your network settings, select Set up a new connection or network and then select Connect to a workplace.

To configure your VPN connection, in the Connect to a Workplace wizard, provide the following information:

  • How do you want to connect? You can connect by using an existing internet connection or by dialing directly to your workplace.
  • Internet address This is the name or IP address of the computer that you connect to at your workplace, as shown in Figure 1-22. Typically, this is an FQDN, such as remote.adatum.com.

Figure 1-22 The Connect to a Workplace wizard

  • Destination name This is the name of this VPN connection.

After you have created the VPN connection, from the Network And Sharing Center, select Change adapter settings, right-click your VPN connection, and select Properties. As shown in Figure 1-23, you can then configure additional options as required by your organization’s network infrastructure.

Figure 1-23 The Security tab of a VPN connection

These settings must match the remote access device that your device connects to, and includes the following options:

  • Type of VPN Point-to-Point Tunneling Protocol (PPTP), Layer Two Tunneling Protocol with IPsec (L2TP/IPsec), Secure Socket Tunneling Protocol (SSTP), or Internet Key Exchange version 2 (IKEv2).
  • Data encryption None, Optional, Required, or Maximum Strength.

In the Authentication section, you choose either Use Extensible Authentication Protocol (EAP) or Allow These Protocols. If you choose to use EAP, you then configure one of the following:

  • Microsoft: EAP-AKA (Encryption Enabled)
  • Microsoft: EAP-SIM (Encryption Enabled)
  • Microsoft: EAP-TTLS (Encryption Enabled)
  • Microsoft: Protected EAP (PEAP) (Encryption Enabled)
  • Microsoft: Secured Password (EAP-MSCHAP v2) (Encryption Enabled)
  • Microsoft: Smart Card Or Other Certificate (Encryption Enabled)

If you choose Allow These Protocols, you then configure the following options:

  • Unencrypted Password (PAP)
  • Challenge Handshake Authentication Protocol (CHAP)
  • Microsoft CHAP Version 2 (MS-CHAP v2)
  • Automatically Use My Windows Log-on Name And Password (And Domain, If Any)

Using the Settings app to create and configure a VPN – Deploy and upgrade operating systems

Using the Settings app to create and configure a VPN

You can also use the Settings app to create and configure VPN connections. Use the following procedure:

  1. Select Start and then select Settings.
  2. In Settings, select Network & Internet.
  3. Select the VPN tab, and then, in the details pane, select Add a VPN connection.
  4. On the Add a VPN connection page, enter the following information:
  • VPN provider: Windows (Built-In).
    • Connection name
    • Server name or address
    • VPN type: Automatic (Default). You can also choose PPTP, L2TP/IPsec With Certificate, L2TP/IPsec With Pre-Shared Key, SSTP, or IKEv2.
    • Type of sign-in info: Username and password, Smart card, One-off password, or Certificate.
    • Username and Password, although these options are only configurable if you selected Username And Password as the Type of sign-in info.

5. Select Save.

After you have created the VPN, you can manage it from Network Connections in Control Panel. Alternatively, on the VPN page in the Network & Internet node in Settings, you can select the VPN and then choose Advanced Options. From there, you can reconfigure the VPN’s settings.

VPN profiles

Although manually configuring VPN connections is relatively simple, completing the process on many computers, with the same or similar settings, is very time-consuming. In these circumstances, it makes sense to create a VPN profile and then distribute the profile to your users’ computers.

When you use VPN profiles in Windows 10, you can take advantage of a number of advanced features. These are:

  • Always On This feature enables Windows to automatically connect to a VPN. The Always On feature can be triggered by sign-in when the desktop is unlocked, and on network changes. When the Always On profile is configured, VPN remains always connected unless the user disconnects manually or logs off the device. The profile is optimized for power and performance, and the profiles can be pushed and managed on devices using MDM tools.
  • App-Triggered VPN You can configure the VPN profile to respond to a specific set of apps; if a defined app loads, then the VPN initiates.
  • Traffic Filters To protect the server from a remote attack, an administrator can configure policies on a Windows 10 device to inspect and, if necessary, filter VPN traffic before it is enabled to travel over the VPN. There are two types of Traffic Filter rules available:
    • App-based rules An app-based rule will only enable VPN traffic originating from applications that have been marked as being allowed to traverse the VPN interface.
    • Traffic-based rules Enterprise-level traffic-based rules enable fine-tuning of what type of traffic is allowed. By using the industry-standard rules covered by five tuple policies (protocol, source/destination IP address, source/destination port), administrators can be very specific on the type of network traffic that is allowed to travel over the VPN interface.

An administrator can combine both app-based rules and traffic-based rules.

  • LockDown VPN The LockDown VPN profile is used to enforce the use of the VPN interface. In this scenario, the device is secured to only allow network traffic over the VPN, which is automatically always on and can never be disconnected. If the VPN is unable to connect, then there will be no network traffic allowed. The LockDown profile overrides all other VPN profiles and must be deleted before other profiles can be added, removed, or connected.

You can create and distribute Windows 10 VPN profiles with these advanced settings by using Microsoft Intune and/or Endpoint Configuration Manager.

Need More Review? VPN Connections in Microsoft Intune

To review further details about VPN connections in Microsoft Intune, refer to the Microsoft website at https://docs.microsoft.com/intune/vpn-settings-configure.

Need More Review? How to Create VPN Profiles in Configuration Manager

To review further details about creating VPN profiles in Configuration Manager, refer to the Microsoft website at https://docs.microsoft.com/en-us/sccm/mdm/deploy-use/create-vpn-profiles

Create, validate, and assign deployment profiles – Deploy and upgrade operating systems

Create, validate, and assign deployment profiles

You use Deployment Profiles to customize the OOBE for a device or group of devices when using Windows Autopilot. You can create a single default deployment profile of settings for your whole organization, or you can create additional deployment profiles and assign them to device groups.

New functionality has been added to Windows Autopilot with each release of Windows, and this is likely to continue. In Table 1-11, you can review how each version of Windows 10 since Version 1803 has introduced changes to how the Autopilot profile is downloaded.

TABLE 1-11 Windows Autopilot profile download

Windows 10 versionProfile download behavior
1803The Autopilot profile is downloaded as soon as possible. When using a wired connection, this is downloaded at the start of OOBE. If wireless, it is downloaded after the network connection page is displayed.
1809The Autopilot profile is downloaded as soon as possible, and it is downloaded again after each reboot.
1903White glove deployment added. Enables partners or IT support staff to pre-provision devices. Autopilot is now self-updating during OOBE. Sets the diagnostics data level to Full during OOBE.
1909No specific improvements to Autopilot.
2004Supports user-driven Hybrid Azure Active Directory join with VPN support (made available for 1903 and 1909). If the device is connected to Ethernet, language, locale, and keyboard pages are skipped in OOBE if configured in the profile.
20H1Support for HoloLens deployments and for co-management.
21H2Improvements to diagnostics collection and role-based access control for Autopilot administrators.

Note Force Autopilot Profile to Be Downloaded

If a device has not downloaded an Autopilot profile, you should reboot the device during OOBE to allow the device to retrieve the profile. You can press Shift-F10 to open a command prompt at the start of the OOBE and then enter shutdown /r /t 0 to restart the device immediately, or enter shutdown /s /t 0 to shut down immediately.

At the time of this writing, the available profile settings that you can configure within a Windows Autopilot deployment profile are shown in Table 1-12.

TABLE 1-12 Windows Autopilot deployment profile settings

Profile settingDescription
Convert All Targeted Devices To AutopilotEnables you to register all targeted devices to Autopilot if not already registered. The next time registered devices go through the OOBE, they go through the assigned Autopilot scenario.
Deployment ModeUser-driven devices are devices that are associated with the user enrolling the device. Self-Deploying (preview) devices have no user affinity; an example is a kiosk device. If this setting is chosen, the following settings are enabled: Skip Work Or Home Usage SelectionSkip OEM Registration And OneDrive ConfigurationSkip User Authentication In OOBE
Join To Azure AD AsAzure AD–joined = Cloud-only Hybrid Azure AD–joined = Cloud and on-premises Windows Server Active Directory
Microsoft Software License TermsThis means that organizations accept the software license terms on behalf of their users.
Privacy SettingsOrganizations can choose not to ask users about Microsoft-related privacy settings during the OOBE process.
Hide Change Account OptionsRemoves the option for users to restart the OOBE process with a different account. (Requires Windows 10 1809 or later.)
User Account TypeTypically, during the OOBE process, a device will automatically be set up with administrator access. This option can be disabled when using Windows Autopilot as you can choose a Standard or Administrator account type.
Allow White Glove OOBEEnables a partner or IT pro to press the Windows key five times during OOBE to run without user authentication, enroll the device, and provision all system-context apps and settings.
Language (Region)Enables you to select the appropriate regional settings. The keyboard is automatically selected based on this selection unless you choose otherwise. Defaults to Operating System default.
Automatically Configure KeyboardIf Yes, uses the regional selection to choose keyboard layout.
Apply Device Name TemplateAllows you to specify a naming convention to automatically name devices. For example, Contoso-%RAND:3% will generate a device name such as Contoso-565.

Note Company Branding is Required for Autopilot

You will notice that Autopilot profiles allow you to choose whether a user is presented with the company branding during OOBE. This setting is optional in each profile you create. Regardless of how you configure deployment profiles, you must configure Azure Active Directory Company Branding.

Use the following procedure to create a deployment profile using Microsoft Intune for a user-driven device that is to be joined to Azure AD:

  1. Open the Microsoft Endpoint Manager admin center and sign in as a global admin.
  2. Select Devices, select Enroll devices, and then select the Automatic Enrollment tile.
  3. Ensure the MDM user scope is not set to None.
  4. Go back to Enroll devices and select Deployment Profiles.
  5. Select Create profile and choose Windows PC.
  6. On the Create profile page, on the Basics tab, enter a profile name and optional description.
  7. Select Next, and then, on the Out-of-box experience (OOBE) tab, displayed in Figure 1-9, configure the values described in Table 1-12 and then select Next.

Figure 1-9 Creating an Autopilot profile

  1. On the Assignments page, choose the device groups you want to include or exclude, or choose Add all devices. Then select Next.
  2. On the Review + create tab, select Create.

After you’ve assigned the profile, devices are allocated to the profile during the Windows Autopilot process.

Extract device hardware information – Deploy and upgrade operating systems

Extract device hardware information

The next stage of configuring Windows Autopilot is to extract the device hardware information so that the Autopilot service can recognize devices that will be provisioned using Windows Autopilot.

The device-specific information, which includes hardware device IDs of the devices, needs to be uploaded to Microsoft Intune or to the Microsoft Store for Business, and then synchronized to the Windows Autopilot Deployment Service. You will learn how to upload this information in the next section.

Typically, the hardware vendor that supplied the new devices will upload the device-specific information and associate that information with your organization’s Microsoft 365 tenant. If an organization works closely with a Cloud Solution Provider (CSP) partner, then the vendor may pass the file to it for subsequent uploading via the Partner Center.

Alternatively, the vendor can provide you with a list of the required device information in .csv file format so that you can upload the information.

Another useful method is for the organization to extract the device-specific information from devices by running a Windows PowerShell script. This is especially useful if you are deploying a small number of devices using Windows Autopilot (for example, in a test lab environment or if you are reusing existing devices).

You can extract the hardware ID (or hardware hash) from any existing device that is running Windows 10. Use the Get-WindowsAutoPilotInfo.ps1 PowerShell script, which has been published to the PowerShell Gallery website at https://www.powershellgallery.com/packages/Get-WindowsAutoPilotInfo.

The following script must be run on each computer from an elevated Windows PowerShell prompt:

Click here to view code image

md c:\HWID
Set-Location c:\HWID
Set-ExecutionPolicy Unrestricted
Install-Script -Name Get-WindowsAutoPilotInfo
Get-WindowsAutoPilotInfo.ps1 -OutputFile DeviceID.csv

Once the output file has been created, you can save it to a location such as a USB drive or network share. You must then import the file to your organization’s preferred cloud service, as discussed in the following section.

Note System Center Configuration Manager

It is possible to collect the hardware ID from existing devices by using Configuration Manager, Current Branch Version 1802 or later. This information is automatically collected by Configuration Manager and made available in a new report called Windows Autopilot Device Information. Visit the Microsoft website to understand how to access this report. See https://docs.microsoft.com/sccm/core/plan-design/changes/whats-new-in-version-1802#report-on-windows-autopilot-device-information.

Import device hardware information to cloud service – Deploy and upgrade operating systems

Import device hardware information to cloud service

With the hardware ID for each device, you need to import the information into one of the cloud-based administration centers and then synchronize this information to the Windows Autopilot deployment service.

Devices must be known to Azure AD and registered to your tenant before you can provision the devices using Autopilot.

There are a number of administrative portals that you can use to import the hardware device IDs. However, generally, you’ll use one of the following:

  • Microsoft Endpoint Manager Admin Center
  • Microsoft Store for Business

Use the following procedure to add Windows Autopilot devices to a Microsoft 365 tenant by importing a CSV file with its information:

  1. Open the Microsoft Endpoint Manager admin center and sign in as a global admin.
  2. Select Devices, select Enroll devices, and then select the Devices tile.
  3. On the Windows Autopilot devices page, select Import.
  4. On the Add Windows Autopilot devices blade, browse to a .csv file containing the hardware IDs of the devices you want to add, and select Open.
  5. If the imported file displays as correctly formatted, select Import. It can take up to 15 minutes to import and process the file contents. On the Windows Autopilot Devices page, the banner should indicate that the import is in progress and show the elapsed time.
  6. When the import process has completed, select Sync on the menu bar. A banner should indicate that the synchronization is in progress. The process might take a few minutes to complete, depending on how many devices are being synchronized.
  7. Once the sync process has been completed, you will see a notification indicating whether the sync was successful and whether some devices have not been imported. Select Refresh to see the new devices that have been added.
  8. After you’ve imported the relevant device IDs, you can optionally assign specific devices to particular users. On the Windows Autopilot devices page, select the device check box, and then select Assign user on the toolbar.
  9. On the Select user blade, choose the appropriate user, and then click Select.
  10. On the device ID blade, select Save.

Plan and implement Windows 10 using MDT – Deploy and upgrade operating systems

Skill 1.3: Plan and implement Windows 10 using MDT

MDT is a deployment tool used by many organizations to provide for LTI deployments in on-premises infrastructures. When combined with Endpoint Configuration Manager, you can implement ZTI deployments. In this skill, you’ll learn what you need to know about when and how to use MDT to deploy Windows 10 in your organization.

This skill covers how to:

Choose configuration options based on requirements

Most enterprise organizations have used image-based deployment for many years. Both MDT and Configuration Manager rely on images. When working with images, you must determine whether you want to use a default image, or a custom image to deploy the Windows operating system:

  • Default image A default image is the result of performing a standard installation of Windows 10 on a computer using default values. A default image, install.wim, is provided in the Sources folder on the Windows 10 product DVD. When using default images, remember that:
    • You don’t need to create the image.
    • You must apply settings and apps separately after deployment of the image.
    • Updates to applications don’t affect the image.
    • The same image can be used throughout the organization.
    • End-to-end deployment time is longer than with custom images because you must perform deployment tasks after image application.
  • Custom image A custom image is one that contains additional components, such as drivers and apps, and specific settings and customizations relevant for the organization. When using custom images, remember that:
    • You’ll need to create and maintain the image.
    • You can include all required apps and settings in the image.
    • You might need to maintain multiple images to manage the needs of your different departments.
    • Updates to applications require you to update the image.
    • End-to-end deployment time can be faster.

Note Thin Versus Thick

Images that contain only an operating system are often referred to as thin images, while those that contain many apps are called thick images. Most organizations use thin images because they require less ongoing maintenance.

MDT supports two types of images. These are:

  • Boot images These are used to start the deployment process. It’s fairly typical for computers targeted for deployment with MDT to have no installed operating system. This is known as bare-metal deployment. The boot image can be accessed from a USB thumb drive, a DVD or ISO file, or by using a Pre-Boot Execution Environment (PXE) server (such as Windows Deployment Services). When you deploy MDT, you’ll also install Windows ADK. This includes standard boot images for both x86 and x64 architectures.
  • Operating system images You’ll use the deployment workbench to create and manage your operating system images. As mentioned, you can use either a default or custom image, depending on your requirements.

Create and manage images – Deploy and upgrade operating systems

Create and manage images

Before you can do anything else. You’ll need to create your images. The starting point is a reference image. The reference image is the standard operating system that you’ll deliver to your users. You’ll have to consider what you want to add to the image; for example, adding drivers, apps, or specific configurations.

Create a reference image

After you’ve determined what will be included in the image, you’ll need to create it. Use the following procedure:

  1. On a reference computer, install Windows 10.
  2. Apply any Windows updates.
  3. Add any drivers, apps, or other required software.
  4. Apply any app updates.
  5. Configure any installed apps or software as needed.
  6. Generalize the image.

Exam Tip

You use the Sysprep.exe program to generalize your image. It’s located in the C:\Windows\System32\Sysprep\ folder.

7. Capture the generalized image.

8. Store the captured image in a location accessible to MDT.

In addition to your operating system image, you’ll also need a boot image. Typically, you’ll use the boot image provided on the Windows 10 product DVD or ISO.

Need More Review? Create a Windows 10 Reference Image

To review further details about reference image creation, refer to the Microsoft website at https://docs.microsoft.com/windows/deployment/deploy-windows-mdt/create-a-windows-10-reference-image.

Add the images to MDT

After you’ve created any required images, the next step is to add the images to MDT. Before you can add images, you’ll need to create a deployment share. Use the following procedure:

  1. Open the Deployment Workbench.
  2. Select the Deployment Shares folder.
  3. Right-click Deployment Shares and then select New Deployment Share.
  4. Complete the New Deployment Share Wizard by providing the following:
  • A local path on the MDT server for the share.
    • A share name, such as Deployment Share$.
    • A description.
    • Options that control the deployment experience when images are applied:
      • Ask if a computer backup should be performed.
      • Ask for a product key.
      • Ask to set the local Administrator password.
      • Ask if an image should be captured.
      • Ask if BitLocker should be enabled.

When you’ve created the deployment share, you can add your images to it.

To add an operating system image, use the following procedure:

  1. Expand your deployment share and select Operating Systems.
  2. Right-click Operating Systems and then select Import Operating System.
  3. Complete the Import Operating System Wizard, displayed in Figure 1-12, by entering the following information:

Figure 1-12 Choosing the operating system image type

  • Choose between Full set of source files, Custom image file, and Windows Deployment Services image.
    • The source location for your image.
    • A WDS server name, if you’re using a Windows Deployment Services image.
    • A destination directory name.

Manage application and driver deployment – Deploy and upgrade operating systems

Manage application and driver deployment

You can use MDT to deploy and manage apps and drivers. To add applications, use the following procedure:

  1. In your deployment share, select and then right-click Applications.
  2. Select New Application.
  3. Complete the New Application Wizard by entering the following information:
  • Choose between Application with source files, Application without source files or elsewhere on the network, or Application bundle.
    • The details for the app, including Publisher, Application Name, Version, and Language.
    • The Source (where the files are for the app) and the Destination (the name by which the app is known).
    • Any command-line details needed to install the app. For example, for XML Notepad, the command line would typically be xmlnotepad.msi /q.

Exam Tip

If you want to deploy many apps, consider using a Windows PowerShell script to accelerate the process. You’ll need to import the MicrosoftDeploymentToolkit module.

Installing drivers is pretty similar:

  1. Select and then right-click the Out-of-Box Drivers folder.
  2. Select Import Drivers.
  3. Specify the folder location for drivers you want to import.

Create and use task sequences

After you’ve added all the required images, apps, and drivers, you must create task sequences to apply these to target computers. Task sequences are the collection of actions performed to complete a specific job, such as deploy Windows 10 and related apps to a target computer.

You use predefined templates to create your task sequences. Tasks typically include the following:

  • Gather This task reads required configuration information from a deployment server.
  • Format and Partition This task prepares the target hard disk for the operating system you’re deploying.
  • Inject Drivers This task obtains the required drivers for a target computer and downloads them from a driver repository.
  • Apply Operating System This task deploys the appropriate operating system image.
  • Windows Update This task connects to a WSUS server and retrieves updates to apply to the target computer.

To create a task sequence, use the following procedure:

  1. In your deployment share, select and then right-click Task Sequences.
  2. Select New Task Sequence.
  3. Complete the New Task Sequence Wizard by entering the following information:
  • A Task sequence ID and Task sequence name. These identify the task sequence, and together with optional Task sequence comments, are displayed by the deployment wizard during deployment.
    • Choose a template. You can choose between Sysprep and Capture, Standard Client Task Sequence, Standard Client Upgrade Task Sequence, Post OS Installation Task Sequence, and many others.
    • Choose the Operating Systems image.
    • If necessary, enter a product key.
    • Enter a user Full Name, Organization, web browser home page, and local administrator account password.

After you’ve created the task sequence, you’ll need to configure its settings. The procedure will vary based on what the task sequence does. But for example, to complete the process of configuring an operating system deployment task sequence, use the following procedure:

  1. In your deployment share, in the Task Sequences folder, right-click your task sequence and select Properties.
  2. Select the Task Sequence tab, displayed in Figure 1-13.

Figure 1-13 Reviewing the task sequence details

3. Verify and modify any required settings.

The final step before deployment is to configure the deployment share properties and related Windows PE settings. Use the following procedure:

  1. Right-click your deployment share and select Properties.
  2. On the General tab, verify the Platforms Supported (x86 and x64).
  3. Optionally, select the Enable multicast for this deployment share check box. This is only available if you’ve deployed a Windows Deployment Services role in your environment.
  4. On the Rules tab, review the contents of the displayed CustomSettings.ini file. These were defined in the initial task sequence creation.
  5. On the Windows PE tab, review the settings for creating a Windows PE boot disk. Remember to review the settings for your platform by selecting either x86 or x64 in the Platform list.
  6. On the Windows PE tab, beneath the Platform list, select the Features tab and review and revise required settings. These options determine additional features.
  7. Select OK, and if you made any changes, right-click your deployment share and select Update Deployment Share. Complete the wizard to refresh the settings in your deployment share.